Showing posts with label Tools. Show all posts

Sunday, September 11, 2011

How Do You Cut?

How many cutting tools do you have in your sewing room?  I think at any given point I have about a dozen.  Usually about half of them are missing - brought into another room and not returned, buried underneath a project or mysteriously just missing.  Here are the must-have cutting tools that I could round up today:

(1) Clauss cutting sheers   (2) Plastic handled generic scissors   (3 & 4) Rotary cutters   (5) Threat clippers   (6) Small curved craft scissors   (7) Seam ripper

I have these cutting tools spread around my sewing room at all times - each serves a purpose all of them are use almost daily. 

First I like to introduce you to my heavy duty 8" Hot Forged Clauss Dress Maker sears.  That are pretty heavy and super sharp.  Best of all - it cuts through everything like butter.  I keep it around my cutting table and my #1 use of this is for trimming quilts.  It cuts through the quilt top, batting and quilt cotton like ... butter ;)

To contrast the Clauss scissors, meet my generic plastic handled scissors.  Doesn't cost much and I think I have 3-5 of these around the house.  The primary purpose of having these around is that I don't have to rely on my 'good' scissors to cut through stuff like paper, cardboard or plastic.  Super handy, pretty sharp for a while and inexpensive.


Every quilters best friend.  I have 3 of these - I'm missing my tiny one :).  Love these, they make cutting straight lines (with a straight edge) accurate and quick.  If you are doing more detailed cutting then a smaller rotary cutter would be helpful - if you ever see my small one in the background of a picture or if you visit my sewing room and stumble across it, PLEASE let me know ;).


Thread clippers are awesome to have next the sewing machine.  I remember when I was little my mom would always have a string tied to hers - on the other side of the string?  The sewing machine of course.  After sewing for years now, I can see why she did that.  I use this ALL the time.  I prefer using this over the auto-thread cutter on my sewing machine and awesome to have around to cut any loose threads.


These little craft scissors are my go-to thread trimmers for finished projects.  I usually leave these by my sofa and do detailed thread trimmings while watching television at night.  The narrow tipped ends are perfect for reaching those hard to reach areas.

Last but definitely not least - I have my seam ripper.  Sits next to my sewing machine and comes in handy when you have those OOPS moments :)


What cutting tools do you have around your sewing room?  What are you must-haves?  Do you loose yours as often as I loose mine??? 

Have a great and productive week everyone! :)

Friday, March 4, 2011

Quilt Top Finishing Touches

After all the piecing and pressing it's time to put together the quilt sandwich correct?  Not quite.  I like to give my quilt top (and bottom if it's pieced) a little TLC before sandwiching. This ensures the quilt top measurements are accurate, all loose threads and debris are gone and the all seams are pressed down.

The process and tools:

(1) Mark any areas that need to be trimmed with a ruler and non-staining marking pencil or chalk.

IMG_4910

(2) Trim off all the marked areas from step (1). I usually use fabric scissors for this step for larger quilts but for smaller projects I use my rotary cutter and mat. Have your ruler handy to make sure all cuts are accurate.

IMG_4904

(3) Use little trimming scissors to trim off any access threads. You want to make all the threads are trimmed before quilting because loose threads can get quilted onto the quilt and difficult to trim off later.

IMG_4900

(4) Make sure all loose threads are picked off. I use a lint brush for this because thread tends to cling to everything and somehow find itself back on the quilt top if not properly disposed of.

IMG_4901

(5) Have your iron board and iron out again for a final pass to make sure all seams are securely pressed down. Having seams flat ensures a nice even quilt top without any weird lumps. It also makes for easier quilting.

IMG_4899

After ALL these steps on both the quilt top and quilt bottom, I am now ready for some sandwiching :).

-Q

Monday, November 22, 2010

Red Poppies Spring Up - And Some QT With The Sewing Machine

In the midst of some freezing temperatures, rain and even snow - I find the need to make something to remind me of warmer days.

IMG_0122_2

How about poppies? :)  I'm a Californian and there's something about the sight of poppies that always make me smile...

Also - new project, new tool.  I'm recently brought the Petite Press:
IMG_0126

Love it! I tried a couple of mini-sized craft irons before and by far this one is the best.  It head tilts for different ironing angles, 4 different heat settings (though I just keep it on the highest one usually) and it's super comfortable to use.  I recommend it for any quilter or crafter out there who needs a mini-iron.

And the Petite Iron was definitely a life-saver when I had to press all these appliques in place:
IMG_0118_2
There were actually 3 rows of poppies :).


And yes I finally was able to use my sewing machine :) - how long as it been??? Weeks?? :P

IMG_0132_2

I feel like I need to play the song - "united and it feels so gooood"!

Ahhh - sewing at last :).

IMG_0133_2

Wednesday, August 4, 2010

Hand Quilting Complete & Tools Must Haves for Hand Quilting

I couldn't believe it myself. It's been MONTHS and countless hours but the hand quilting is finished on Borders and Stripes. I'll show the whole quilt top once I finish the binding - promise :).

Like most quilts, there's usually a lesson or two learned, a story, or a memory that goes with the quilt. With Borders and Stripes I have learned many 'new to me' gadgets to help make the process much more enjoyable. Last post I wrote about the stick on thimbles- a very good alternative to regular thimbles for folks like me who either loose them or it doesn't fit properly.
Love these little pads. From start to finish this quilt took only 3 of these pads - not bad considering that I kept having to take them off and on all the time because I only had time to quilt for like 1/2 hr straight because the kids needed attention.

Another great tool to help along the way was 1/4" quilter's masking tape. It was great to use along the parameter was the quilt to guide where the hand-quilting to start and where it should end. Though I did learn along the way that it's too tedious use and not very appropriate for quilting straight lines on the actual quilt top area. But it was great around the parameter of the quilt though since it stayed the whole time and very easy to take off.

The 1/4" quilter's tape essentially a very thin masking tape. It worked very well along the edge of the quilt to mark where I needed to end my hand quilting. I tried it on the quilt top to guide straight lines pictured above - this was very time consuming and wasted a lot of tape. I ended up not using the tape for this purpose and stuck with using it only for the edges.

And last but not least - the marking chalk. I don't remember which brand it was, but I did pick it up at Joannes so it shouldn't be that hard to find. It comes with a chalk holder case and a bunch of colored chalk sticks. They are a much more efficient and cost effective way to mark a quilt top. This will be a great for machine quilting too.

Here's a view of the 'pen' casing that comes with the kit. You just slide the chalk in and use. Pictured underneath the pen is some of the replacement chalk that came with the kit. There's many different colors.

The chalk in action. Pictured is the green chalk marking on the off-white fabric. It creates a temporarily line to help guide the quilting.

I know these are probably like regular tools for experienced quilters, but this is new to me so bear with me through the excitement as I 'discover' these tools :P. They make all these different tools for a reason right? So we could find the tool that fits our own unique needs. So go out there and experiment, find something new or at least new-to-you. Happy quilting everyone.

And yes I'll post soon with the finished results of this quilt. Can't wait to use it! This one is a keeper and will be staying with me in my collection :).

Thursday, June 24, 2010

My Finger Thanks You

I been through countless thimbles.  They usually...suck.  They're either too small, too big, too slippery, too hard, too soft, or I just loose them.  They're expensive and, for me, they're pretty useless.  For my previous projects I suffered through at least 1 new thimble but usually end up just using bandages.  Hey they're relatively inexpensive, stay on, and you could adjust it to fit just right :).

But guess what?  I found a solution that I LOVE!  So to tackle this quilt:


I have discovered this:

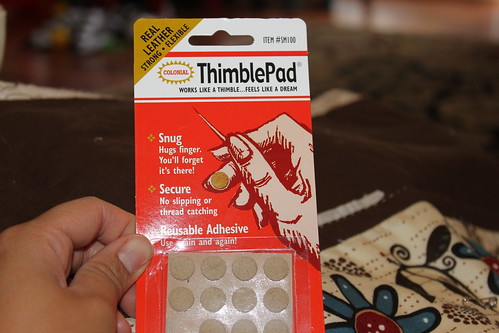
They are leather STICK on thimble pads from Colonial...and my hand quilting savior.  Sure I was skeptical, very skeptical in the beginning.  Will they actually stay on?  Would that little piece of leather be enough coverage? Would it hurt to pull it off?  How long will it actually last?  Would I go through this whole 12 pack before I even finish my quilt??

Yes they stay on very well.  Yes there is enough coverage.  No, it doesn't hurt to pull it off - well not more than a package.  I have been using the same little piece for almost a week now, so I've gone through about 1/4 of a full size quilt and that same little piece is still going strong.  And no I will NOT finish the whole 12 pack with this one quilt.  At this rate I think I'll probably go through 2 or 3 of them. 

Another great thing about these?  You could stick it to any hard surface when you're not using them.  That means I don't have to worry about them rolling away or my kids playing with them.  I just stick it on the scissors I'm using or on the edge of the cup table.  Very small and discrete :).   I am going to put in another order of these babies.

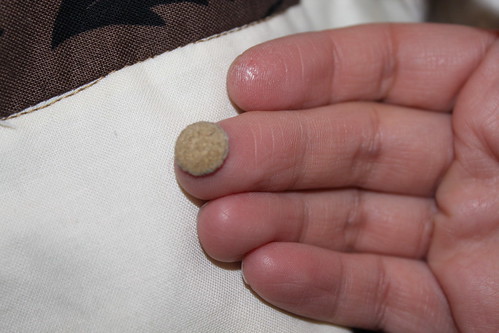
I am definitely not cut out for hand modeling, but I just wanted to show you a picture of the little thimble in action.


The brand I use is Colonial and they're called ThimblePad.  Definitely on top of my list of favorite sewing tools.

Tuesday, May 18, 2010

Quilting Along...

Been a while since I got to do any whole blanket quilting.  It was a hard decision picking the quilting thread color for the Modded Brown quilt.

After much thought - and some trial and error - I went with a dark gray, almost black, colored thread.

IMG_4425
The dark gray was a little shocking next to the light gray fabric when I first started to quilt, but I got used to it after a while.

How many different colors did I end up trying before settling on the final one?
  1. Dark brown. There was a lot of dark brown on the quilt so I decided to match, but it didn't really go well when quilted on top of the other colors.  Even on the dark brown, it thread color just blended and didn't provide much to the quilt top.
  2. Beige.  Went really well with the Red print and Olive print fabrics.  However it was too contrasting to the brown and didn't go well with the light gray at all.
Okay - 2.  I considered some other colors briefly - dark red, dark blue - but quickly decided against them.  The dark gray thread on this quilt is growing on me and now that I'm about 75% done, it is beginning to look like a good color choice :).

I don't use a quilting frame - more on that on a later post - so I had quite a task maneuvering this larger quilt time around.  But with the help of some sticky top gloves (my make-shift quilting clothes) I got it under control.

I garden a lot so I decided to get a clean pair of these gardening gloves from a local gardening center:

IMG_3797
These are very thin so it doesn't feel clunky when quilting.  All on the front are little sticky circles and provides a very nice grip for the quilt tops.  I got this for a couple of bucks :).

I still have a little bit of quilting to finish up for this quilt.  I'm kind of sad to see the quilting ending actually ... guess I really like this part of the process.  Well here's the quilt right now waiting to be finished.

IMG_4428

LinkWithin

Related Posts Plugin for WordPress, Blogger...