Showing posts with label hand-quilting. Show all posts

Sunday, August 8, 2010

Borders & Stripes: Binding

Borders and Stripes has finally entered the Binding stage of quilt making. To help ensure that the binding goes on smoothly and evenly I always do a machine stitch around the trimmed quilt.


Tip: Notice the light brown stitch along the edge of the quilt. This is an extra step I use to make sure all the edges are flattened and everything is nicely squared up. This makes attaching the binding super easy.

For the binding I'm using a Moda dark brown solid. It's the same brown as the solids on the quilt top and quilt back. I cut 2.5" strips and iron them in half. This creates a very strong binding for the quilt. Then the prepared binding is attached to the quilt top - raw edges matching up:


Stitch all around the quilt top about 1/4" away from the edge using mitered corners for each of the corners.

The top front of the quilt top after the binding is attached should look like this. Notice the nice clean edge.


When the binding is folded over to hand bind to the back, the front should look like this:


The quilt top where the binding is attached should be free of pinches, you shouldn't be able to see any of the threads, and it should be in a nice straight line. The picture above is also a nice closeup of the hand quilt work around the flowers. Notice how the hand quilting goes right up to the edge of the quilt.

Now this quilt is ready for some hand binding and off the washing and drying machine for a nice rinsing. It's my first time using the marking chalk so hopefully it comes out nice and easy in the wash :). I'll post with the final quilt results very soon.

Wednesday, August 4, 2010

Hand Quilting Complete & Tools Must Haves for Hand Quilting

I couldn't believe it myself. It's been MONTHS and countless hours but the hand quilting is finished on Borders and Stripes. I'll show the whole quilt top once I finish the binding - promise :).

Like most quilts, there's usually a lesson or two learned, a story, or a memory that goes with the quilt. With Borders and Stripes I have learned many 'new to me' gadgets to help make the process much more enjoyable. Last post I wrote about the stick on thimbles- a very good alternative to regular thimbles for folks like me who either loose them or it doesn't fit properly.
Love these little pads. From start to finish this quilt took only 3 of these pads - not bad considering that I kept having to take them off and on all the time because I only had time to quilt for like 1/2 hr straight because the kids needed attention.

Another great tool to help along the way was 1/4" quilter's masking tape. It was great to use along the parameter was the quilt to guide where the hand-quilting to start and where it should end. Though I did learn along the way that it's too tedious use and not very appropriate for quilting straight lines on the actual quilt top area. But it was great around the parameter of the quilt though since it stayed the whole time and very easy to take off.

The 1/4" quilter's tape essentially a very thin masking tape. It worked very well along the edge of the quilt to mark where I needed to end my hand quilting. I tried it on the quilt top to guide straight lines pictured above - this was very time consuming and wasted a lot of tape. I ended up not using the tape for this purpose and stuck with using it only for the edges.

And last but not least - the marking chalk. I don't remember which brand it was, but I did pick it up at Joannes so it shouldn't be that hard to find. It comes with a chalk holder case and a bunch of colored chalk sticks. They are a much more efficient and cost effective way to mark a quilt top. This will be a great for machine quilting too.

Here's a view of the 'pen' casing that comes with the kit. You just slide the chalk in and use. Pictured underneath the pen is some of the replacement chalk that came with the kit. There's many different colors.

The chalk in action. Pictured is the green chalk marking on the off-white fabric. It creates a temporarily line to help guide the quilting.

I know these are probably like regular tools for experienced quilters, but this is new to me so bear with me through the excitement as I 'discover' these tools :P. They make all these different tools for a reason right? So we could find the tool that fits our own unique needs. So go out there and experiment, find something new or at least new-to-you. Happy quilting everyone.

And yes I'll post soon with the finished results of this quilt. Can't wait to use it! This one is a keeper and will be staying with me in my collection :).

Thursday, June 24, 2010

My Finger Thanks You

I been through countless thimbles.  They usually...suck.  They're either too small, too big, too slippery, too hard, too soft, or I just loose them.  They're expensive and, for me, they're pretty useless.  For my previous projects I suffered through at least 1 new thimble but usually end up just using bandages.  Hey they're relatively inexpensive, stay on, and you could adjust it to fit just right :).

But guess what?  I found a solution that I LOVE!  So to tackle this quilt:


I have discovered this:

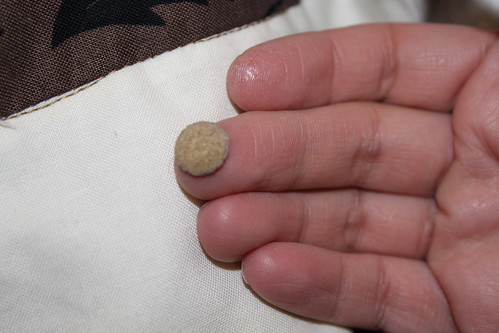
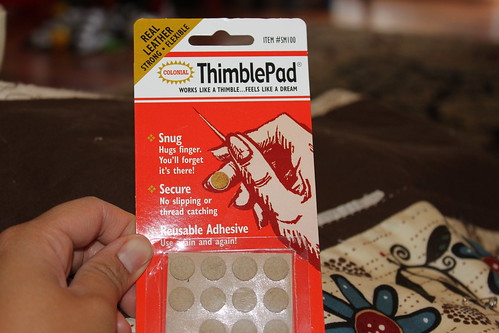
They are leather STICK on thimble pads from Colonial...and my hand quilting savior.  Sure I was skeptical, very skeptical in the beginning.  Will they actually stay on?  Would that little piece of leather be enough coverage? Would it hurt to pull it off?  How long will it actually last?  Would I go through this whole 12 pack before I even finish my quilt??

Yes they stay on very well.  Yes there is enough coverage.  No, it doesn't hurt to pull it off - well not more than a package.  I have been using the same little piece for almost a week now, so I've gone through about 1/4 of a full size quilt and that same little piece is still going strong.  And no I will NOT finish the whole 12 pack with this one quilt.  At this rate I think I'll probably go through 2 or 3 of them. 

Another great thing about these?  You could stick it to any hard surface when you're not using them.  That means I don't have to worry about them rolling away or my kids playing with them.  I just stick it on the scissors I'm using or on the edge of the cup table.  Very small and discrete :).   I am going to put in another order of these babies.

I am definitely not cut out for hand modeling, but I just wanted to show you a picture of the little thimble in action.


The brand I use is Colonial and they're called ThimblePad.  Definitely on top of my list of favorite sewing tools.

Borders and Stripes - Hand Quilting Begins

I don't know how this happened, but it was definitely not the initial plan for this quilt.  After scrapping the initial plan to machine quilt it then spending the last few days taking out about a large section of machine quilting this is the final plan:

Hand quilting Borders and Stripes.  For the straight line hand quilting, I marked small sections with masking type to make sure the lines are straight.

Yep that's right - I'm hand-quilting!  I haven't hand quilted a quilt for a few months now.  I guess I miss it.  As much as I like the convenience and results of machine quilting, there is nothing like hand quilting.  It looks different, it feels different, and it gives a quilt a very nice old fashioned custom look. 

Borders and Stripes piecing was very simple - consisting of strips of different fabrics.  After doing a little machine on it, I soon realized that it was not the right approach for this quilt.  I'm still not 100% sure what kind of quilting pattern I want on the whole quilt but I am confident that hand quilting was the right thing.

So far I have 3 straight lines quilted - and about 50 more to go.  I'm going to be doing the straight line on all the solid browns.  I used a off-white thread to match the backside of the quilt.  My goal is to always use thread that is the same color as the backside. 

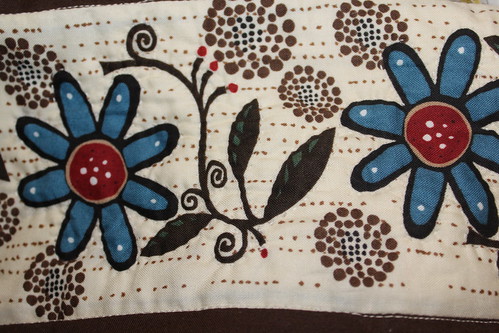
For the Borders fabric I did an outline of the flowers and stems (Bryant Park fabric).  There's 3 Borders strips so I'm about 20% done with that part.  Here's a closeup of a Border strip:

Doesn't show up too well in the photo, but it's a pretty discrete hand quilted outline around each flower and stem on the Bryant Park fabric.  This is creating a very nice look and feel to the quilt.  A lot more work to do but I am liking the results a lot.

 The back side of the floral hand quilting.  Loving it.

One of the goals of doing this type of hand quilting is to preserve the look of this pretty fabric.  Here's a closeup of the fabric before quilting.  I didn't want any quilt lines to take away from the overall look and feel of the design.

 A look at the fabric before the quilting.

This has been a lot of work...and a lot more to do.  But I do love the results of hand quilting.

Monday, May 3, 2010

Borders and Scripes - Design & Piecing


Remember this fabric that I posted a while back?

IMG_3874
Strips that I cut up a little while back.

Well, I finally got around to making a pattern for it :).  I decided to use the strips on the left side in the photo above - the one without the brown order attached.  There's 4 strips, but I'm only going to use 3 for the next quilt.  The pattern's goal was the maximize the great design of these strips of fabric.  So I decided to design something that wouldn't involve having to cut up the strips.
 
Here's the design front of the quilt:
Borders and Stripes
The blue in the design (or B) will be will the border strips are going to be.  The dark brown and green are also patterned fabrics.  The beige and lighter brown will be solid colors.  The dotted lines is where I'm planning to do some decorative hand quilting.

So, I decided to take the length of the fabric - 75" - and make it the width of the new quilt.  This way I don't have to sacrifice any of the length.  The completed quilt will be 74"x80".

This will be the quilt back:
Borders and Stripes Back
I thought about using the 4th strip of the border fabric for the back, but decided against it last minute.  I didn't want the back to distract from the front any. So I repeated the solid beige and lighter brown color for the back of the quilt - alternating.  This picture make the back look bigger than the front, but trust me it's the same height and width.


The Borders and Stripes stack all ready for piecing:
I always live the look of the fabric after it's been cut - ready for piecing :).


I can't wait to start on this quilt.  I'm a sucker for earth tones and I love the look of this border.

Saturday, March 27, 2010

My Hand-Quilted Quilt

One of my favorite quilts of all time is an all hand-quilted twin size blanket I made a little while back. Why do I like it so much? Number one reason - hand quilting. Even though it was a simple double parallel quilt stitch against all the seams, the hand-quilting gave this quilt the most amazing feel. I enjoyed every stitch of it - even when my hands were tired and my fingers got poked for the God-Knows all many times. I wish I had more time to hand quilt each blanket I make, but unfortunately I do not. I hope to maybe hand-quilt one item A YEAR using the hand-quilting method. I do hand-sew the binding back of all my quilts - even the machine quilted ones.

Here's a few pictures of my hand-quilted quilt that I started at the end 2009 and finished early 2010 - the whole process took about 2.5 months.

IMG_3312
I used an earthy color palette of greens, browns, and whites.

I machine pieced the top together, manually sandwich the layers together, basted it with red string, then ran parallel stiching about and 1/8" on each side of all the seems. This created a very discrete quilt top, showing off all the patterns of the fabric and minimal quilting distractions. The back of the quilt was very simple but elegant with parrallel straight lines creating a nice clean look. As with all my quilts I machine sew the front the binding on to the top of the quilt and hand-sew the back of the binding to the back of the quilt.


IMG_3313
A closer view of the quilt.  Notice the simple double line quilting along the backing - which was an all white muslin cloth. 

IMG_3324
Another view of the quilt - close-up.


Quilt Info:
Line-Square Simplicity (1)
Front: 100% Cotton Print Fabrics
Batting: 50/50 Bamboo & Cotton
Backing: 100% Cotton Muslim 108"
Completed Dimension: 72"x88"
Quilting Method: Hand-Quilting, straight double lines
Binding: Machine Sew to Front and Hand Sew to Back

LinkWithin

Related Posts Plugin for WordPress, Blogger...