
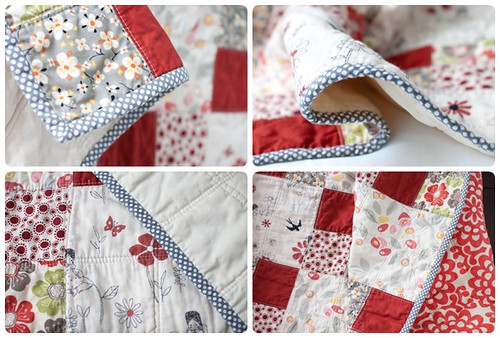
Did I tell you that the binding part of a quilt is my favorite?? :)
In this HOW-TO guide I'll go share my techniques for binding a quilt.
First off let's go over the 2 basic types of binding I usually use to make binding:
(A) Straight-of-Grain binding: Cut from selvage to selvage.
Some characteristics for straight-of-grain binding that I noticed:
- Easy to cut since fabrics lies in a straight line when cutting.
- Super simple to figure out how much fabric you need exactly.
- I don't feel like I'm 'wasting' any fabric since I don't need to cut in an angle like on the bias binding.
- Great for certain fabric patterns. Especially stripes - LOVE striped binding!
- Use it for only straight edged quilts. Since it is cut straight on the grain, the binding doesn't bend well to contour curved/round edged quilts.
- For long term wear and tear, straight-of grain binding may need to be the secondary choice. Since the same thread runs the whole length of the binding once its folded, it creates a vulnerable spot where the whole binding would be in jeopardy if that thread breaks.
(B) Bias Binding: Cut at 45% angle to the selvage edges of the fabric.
Some characteristics for Bias binding that I noticed:
- Creates a very stretchy binding that is great for rounded edges. This is the only way to attacked quilts that are not straight-edged all around.
- More traditional approach to binding that is recognized to create the sturdiest binding.
- To create long strips to make continuous binding without a lot of seams, you do waste some fabric - the triangle leftover after the first and last cut.

OK - on to the actual making of the binding :). Here's step by step instructions on how to create and attach binding to a quilt:
How much binding do you need?
For now this tutorial will only be straight on grain binding. I'll update on a later date on the details of bias binding - probably when I create a new quilt with curved edges so I would need the bias binding :). Other sites details bias binding if you need the info right now like here, here and here.
For straight binding use the following calculations for total length and number of strips needed:


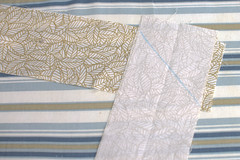
Assembling the strips
1. Lay 2 ends perpendicular of each other, with right sides facing each other. With a marking pen, mark where you need to sew - see picture below:
2. Sew along the marked line and trim along seam with 1/4" allowance:
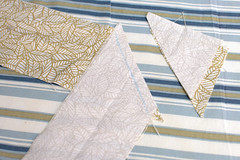
3. Press seam open and trim off extra fabric:
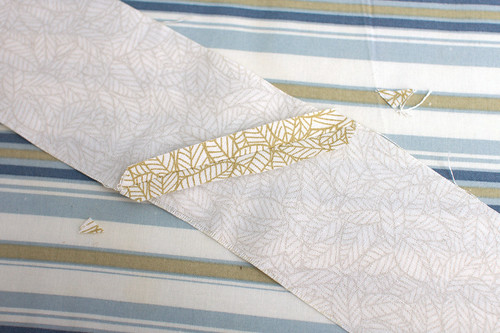
4. Once all the strips are sewn together and pressed, fold in half with right side facing outward and press. Now your binding is ready to use:
Continue to Binding Tutorial: Part 2 of 2 for instructions on how to attach the binding and hand binding tips...coming soon!
As usual I share all my completed projects with these lovely linking parties :).
-Q
12 comments:
Q-
You really write a mean tutorial. I've learned a lot from you since Creative Juice started.
Thanks so much for linking up today!
What a great tutorial. I like your story through photos, too, well done.
Just found you at Show and Tell.. thanks for the tutorial.. I have been sewing for years and I am going to follow you to see if you tackle those corners.. they give me a fit! Hope you have some good suggestions up your sleeve.
thankyou thankyou thankyou! I now feel a little more confindent I can have a go at quilting. binding has always put me off. Thanks again :)
Thanks so much for making this tute! I've made a baby quilt, but have hit a road block with how to finish it off! Now I can book mark your fantastic and detailed tute and plunge forward!
Thanks so much, from a new sewer without a lot of confidence! Look forward to more posts from you!
Thanks so much for making this tute! I've made a baby quilt, but have hit a road block with how to finish it off! Now I can book mark your fantastic and detailed tute and plunge forward!
Thanks so much, from a new sewer without a lot of confidence! Look forward to more posts from you!
thanks so much for the clear instructions and photos...very helpful indeed...and so happy you shared with fridays unfolded!
blessings,
alison
stuff and nonsense
Oh I adore your binding! Thanks so much!
I am currently hosting an auction of vintage and antique linen treasures. Stop by and take a peek.
Have a wonderful weekend.
Great tut. I love to quilt but the binding is my least favorite part of all. Seeing your beautiful quilts makes me long to start a quilt project. Thanks for showing you beautiful work:)
this is usually my least fav part of quilting. thanks for sharing and linking up. i will have to try your tips
amy
www.sistersofthewildwest.blogspot.com
Thank you!! I'm still working on quilting...and have been nervous about the binding! This will help:)
This is a great tutorial! Thanks for linking up last week! I hope to see another of your posts this week! :) http://petitehermine.blogspot.com/2011/04/sunday-linky-party-9-goodies.html
Post a Comment