Tuesday, March 30, 2010

Something I don’t Like – Ironing/Pressing

Last time I wrote about something I really liked about quilting, well this time I’m going to write about something I don’t know – ironing or pressing.


Why I don’t like it? Or could I even say I HATE it? I don’t even know where to begin. Let’s see –

  • The inconvenience of having an ironing board and iron around. My sewing room is small enough as it is without having the ironing table area setup. Maybe I just need a bigger room but it’s totally not a pleasant experience having to iron right now.
  • The heat of the iron on a hot day. Where I live it gets pretty hot in the summer and with an old AC unit that is chugging along on its last legs, it is not pleasant. On days when I do have a lot of pressing to do, I try to do this in the morning or late at night – trying to avoid the (even hotter) room. I think last summer I house got over 90 degrees inside – and that’s WITH the AC running!
  • The fear of burning my fingers or my kids. I don’t like to get near the pressing stage of projects when my kids are around. It’s just too risky. I usually wait till they’re napping, sleeping, or completely placated with toys and/or TV.
  • I just don’t like ironing. Even outside of ironing/pressing sewing projects, I don’t like ironing. I wait until the basket for ‘clothes that needs ironing’ gets completely full before touching it.

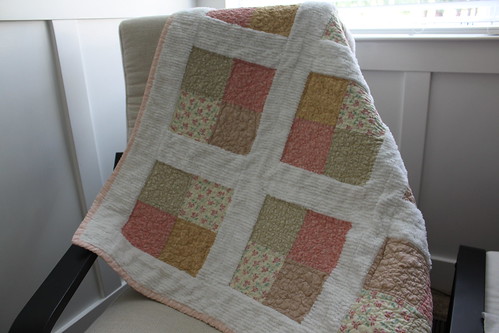
But as much I hate pressing I love the results of it. There’s no way around the advantages of a meticulously pressed quilt top :

  • It’s easier to piece together blocks that are pressed. I like to press each sewn edge right after its sewn. I try sometimes to skip this process and wait till I get a bunch of edges sewn on a block, but this makes it harder to press since you have several edges together.
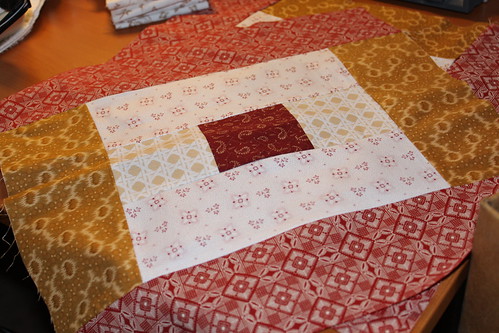
  • It makes the quilt top completely flat if pressed properly. It makes all the patches/blocks act like one flat fabric, thus making it flat. This is great when sandwiching your quilt together.
  • Whether you’re press your seams open (like me) or to one side, it is always good to press them in place before piecing together sewn pieces. You don’t want to be fussing around with holding the seams in place when at the sewing machine – it’s just a bad idea. Take the time and press seams in place before going to the machine.

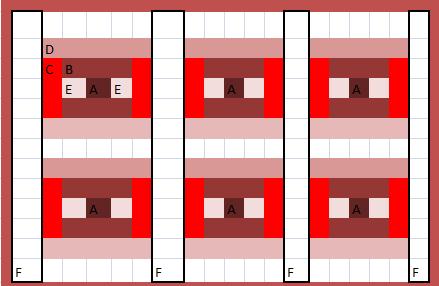
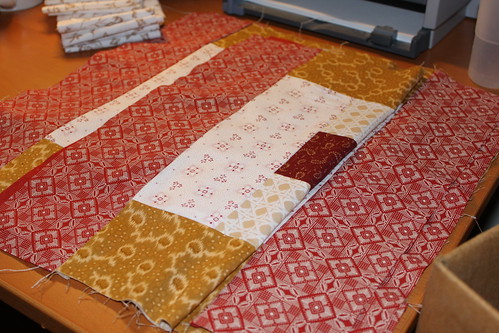
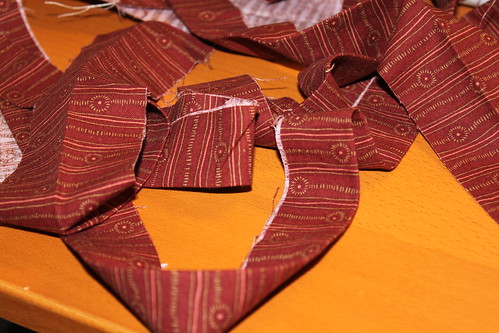
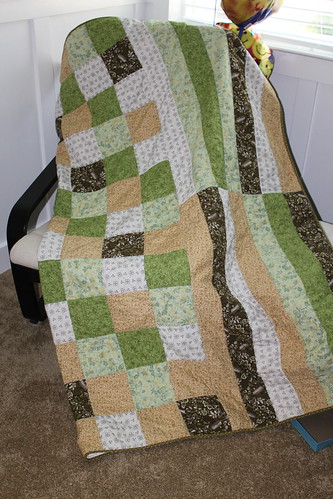
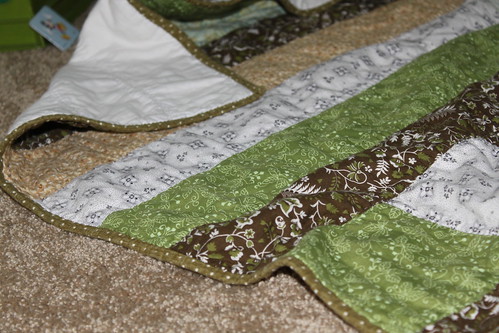
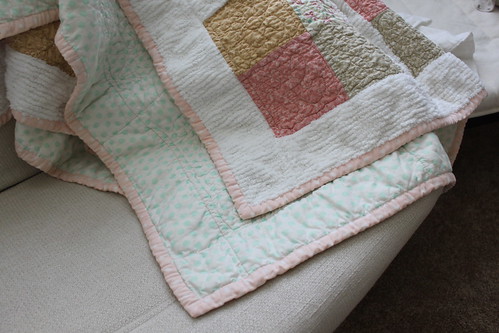
Here’s a picture of my next quilt during one of the ironing sessions.

IMG_3284
Note that if your seams are parallel you could wait till you have all your parallel seams – as long as you don’t have perpendicular ones – sewn to do the ironing.

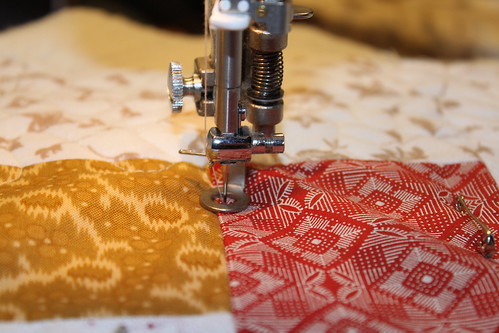
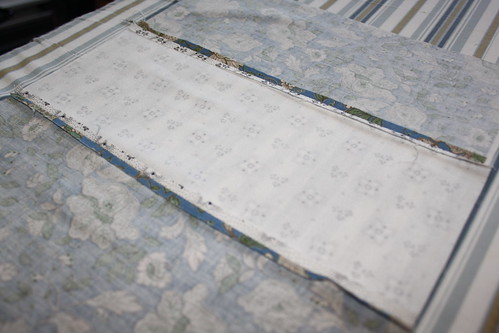
I press the seams open with my finger tips just prior to applying the iron.

IMG_3290

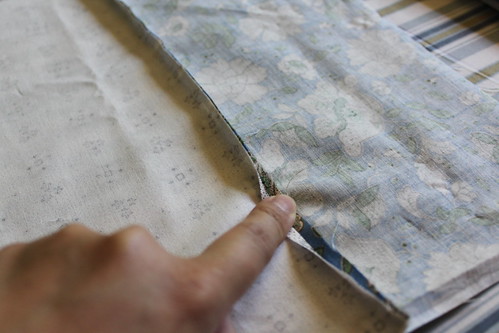
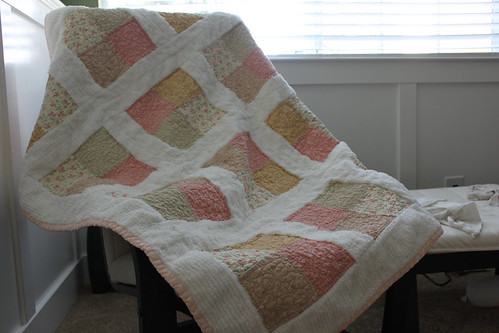
Finger pressing the seam open just before the iron presses it down. I usually press my seams open unless I really need to press it to one side - like working with a thicker material next to a thin one like in the case of the Baby Rose quilt, and maybe fabrics that are very sheer that you don't want to see on the underside.

Haha, here’s my older son letting me know that it’s time to stop ironing and time to start playing :).
IMG_3287
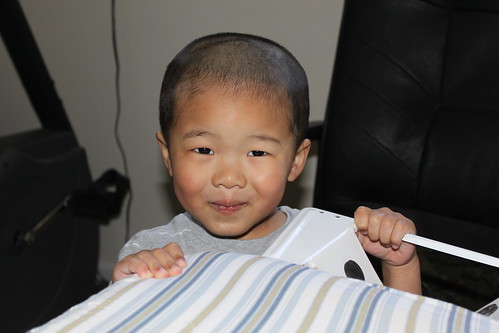
Don’t worry, the iron was put away and turned off by the time this picture was taken :P. I use a regular ironing board for smaller projects. When the quilt gets too big I use lay towels on the floor to 
act as a giant ironing table.


So there you have it – something I HATE about quilting – the need to iron/press. Very good for the quilt but not good for me.

My Sewing Room Setup

When I became more serious about sewing a while back, I decided to convert our current "everything goes" room to a sewing room.  Out came the boxes, extra clothes, old toys, and tons of other random items.  In went my desk-converted-to-sewing table, my 2 sewing machines (Brother XL-3200 and Juki TL-98Q), a ton of sewing notions, and my on-going collection of fabrics.  The room is still a work in progress but it is growing to be quite a busy little sewing room.

Here's my before and after pictures of the now-sewing room.
IMG_3165
The before was a very random room.  It was used an occasional exercise room (re: sit on a exercise bike while playing video games :)), a room for boxes that had no other place in the house, clothes that needs ironing, and even a pinata that didn't get used for a party.  The whole room was pretty much like this.

The after picture.  Well at least part of it...
IMG_3178 
This is the opposite wall of the room.  The side from the original picture still has the exercise bike but not much else.  The wall shown in this picture is my sewing wall.  My husband put on those two shelves to store quilts in progress, notebooks and miscellaneous items. Below the shelves is my desk-converted-to-sewing-table.  It's a nice size table from IKEA that is sturdy enough for my sewing machine and very roomy.  Notice my printer, sewing machine, stationary setup, and quilts could all fit on the table. When I am working on a big project I do clear the table for more room.  On the front of the picture is a filing cabinet (also IKEA) that I use to store quilts that needs to be ironed.  I still need to find a good way to run wiring in this room - as you can see the floor is still quite messy.


I am still trying to figure out a good setup for all the fabric that I have.  Currently I stack it up by either color or design type in the sewing room closet - but it's also home to random clothes and gift wrappers and that sort of thing.  I'm thinking more shelving on that wall that the bike was against and reorganizing the closet.

Here's a picture of the sewing room closet setup...WARNING - it's a work in progress :P
IMG_3180
Most of my fabrics are stacked in this closet - some are organized in boxes or in my living room waiting to be cut into quilts.  This part of the sewing room will need to be REorganized.

As you can see I have quite a lot of work to do on my sewing room.  But it's already turning to be quite a lovely little room with (a little) more room to grow :).

Monday, March 29, 2010

Boxed-In Quilt for Sis

Currently Project: Boxed-In quilt for my sister.  She wanted something with a red theme to it, to be used on a couch, and since I'm a time crunch she wanted something simple.  So I went with the Boxed In design pattern:

The basic design looks like this:

boxedInDesign
The basic idea is for 6 blocks surrounded by sashing on all sides.  The sashing is all one color.  For my sister's quilt I went with a subtle patterned sashing, patterned clocks, and a patterned matching binding.  This finished pattern will be 49"x51" - a good size for a lap quit.

The STACK:
IMG_3162
I always like to take a picture of what I refer to as "THE STACK".  It's all the cut fabric needed for the quilt, stacked up and ready for sewing.  It always amazes me how little the fabric stack looks.

Each block was pieced together, ironed and laid out ready for assembling into the top.  You could see from the photo below the block ready to be assembled.  On the upper left hand corner was the sashing strips.
IMG_3184
 I went from a patterns that were a bit different from each color but still went will together.  

IMG_3185
A closer look at a block. I went with a bold deep red color for the inside, white colored pattern for the middle, and matching exterior patterns for the outer clock color.


While putting the blocks together I was having second thoughts about the color scheme and pattern I picked.  It felt a little too contrasting and a little too bold.  But I chugged along anyways.  And I'm glad I did.  When the top was put together the color scheme finally popped and it's looking to be a very nice quilt.  I'll post more of the progress as I take pictures and finish up the quilt.

Here's a peak of the quilt - still a ways to go but it's looking good.

IMG_3354
I went with a free-style wiggly design all around the quilt. This gave the quilt top a finished, cohesive look since the colors were quite contrasting.  The quilting thread is a 100% cotton quilting thread from Gutermann.  I'm using my Juki TL-98Q with the 1/4" quilting foot attachment.

IMG_3214
Here's a peak of the binding strip.  It's a different pattern from the top but matches quite well to the overall design of the quilt.  I can't wait to finish this up!


Stay tuned for the quilting progress.

Baby Rose Update

I went to the baby shower yesterday for baby Rosalyn Baby Rose. I took along my 3 year old son and the Baby Rose quilt. Both were a hit! :P Before she opened the present I told her that I made it from scratch and even as I continue to remind her of it while she was opening it, she was floored when she saw it. Her reaction was "No way!  You didn't make this!! This look like you brought this." At first I was thinking it was an insult because to me hand-made things are always better than store brought. It is made with special care and attention that you will not usually find in a box store. But thankfully that wasn't what Ros meant at all - she was so surprised by the level of skill that it took to create the quilt, she was surprised that it wasn't done by a professional.

IMG_3311

I'm glad she loved it and her baby will get good use out of it...though I was a little sad to part of that quilt.  It was the first baby quilt I made like that (different fabric types and completely girly) :(. At least I know it's going to a good home. I could always try to duplicate it right? :P

Sunday, March 28, 2010

My Favorite - Making Binding?

Binding Time
IMG_3293

Quite a few people give me a weird stare when I tell them that my favorite part of quilting is putting the binding on the quilt. Why do I enjoy it so much?  To me, it is the binding that gives that quilt the complete look. It is the cherry on top of the sundae. It is the smallest part of the quilt and the least expensive (usually) and still makes such a huge impact on the overall look of the quilt. And I really really enjoy making it :). There's something very orderly and very calming about cutting strips of fabric into strips, pressing it down, and attaching it as the final touch to a long process.

Here's my process in making the binding - aka my fave. I'll go over the attaching of the binding onto the actual quilt in another posting since this posting has actually gotten quite long.

1) Cutting the fabric into strips. This could range from as small to as large as you want. I usually keep it around 2" to 3.5" inches. Must have tools - cutting mat, rotary cutter, and long ruler. You could get this at any local quilting or fabric store. Basic stuff but a must to have if you plan on cutting a lot of straight edges. How much do I cut?
      • Quick calculation:
                        (Quilt Width x 2) + (Quilt Height x2) + (Width of Finish binding  x 4) + 8 inches
      • This will give you the total length of the binding you have to cut. So for a 44" fabric you divide this by 44 to give you the number of strips you have to cut.
      • Example: For a standard crib size quilt of 46" Wide and 60" in Height with a Total length needed: (46 x 2) + (60 x 2) + (0.5 x 4) + 8 = 222"
                         Number of Strips to cut based on 44" wide fabric: 222" / 44 = 5.045 strips
      • Generally is the number like 5.045 I would keep it at 5 strips. If the number is any bigger like 5.2, I go ahead and round up to the next number. So if my number was 5.21 I would go ahead and cut 6 strips of the binding. You could always use the extra fabric for another binding or part of another quilt.
     2) Sewing strips together to form a long strip of binding.
      •  Place end of one strip facing right side up horizontally. Place another strip perpendicular to the horizantal piece with right side  down so the right sides of the two pieces are facing each other.
      • Mark or fold down top piece at a 45 degree angle. This is the line where you are going to sew to make the two pieces join. I usually just press this down to make a crease with my finger and pin it down on 2 spots to keep it in place.
      • Continue matching each ends of the strips together with the ride sides facing each other for the rest of the strips. When you are complete you should have a long strip of binding ready for sewing.
      • Time for sewing! Run over to your sewing machine and sew right on the lines of the creases or markers they you have just  made to binding.
      • Now that your binding is sewed together, cut out the triangle ends at each end of the sewed corners. Cut about 1/4" from the seam.
      • Voila! When all this is complete you should have one single strip of very long binding. Make sure that all your pieces are facing one direction. 
      • Iron the binding in half with the right side facing out.  I press the seams open, this helps the binding be nice and flat with it's attached to the quilt.
      • Now you could either start using your newly made binding on your quilt (more about that in a later posting) or you could store it away for later use. What I usually do is make a few of my bindings at a time, roll them up, pin them down with a little note and put it aside so it'll be ready when the quilting is done.  Another reason why I love binding so much?  It makes for a beautiful decoration for a shelf while it's waiting to be used.

    Here's a photo of 3 sets of bindings all ready to be attached to quilts. I write myself a little note and pin it onto the roll - tells me   what the size of the quilt it's for and doubles to hold the binding in place so it doesn't get unraveled. Makes for a cute little addition to a sewing room also.
    IMG_3189

    After making the binding strips, I roll them up and pin them to keep from unraveling.  One pin and a note to remind myself what size the binding is and I'm done.  Now the binding sits nicely on my shelf until I need it.

    So there you have it. A quick (trust me, when you do this a couple of times, you will get the hang of it real quick) little rundown of how I create the bindings for my quilts. In another posting later on I'll go over how I attach the binding using a sewing machine, make miter corners, and hand sew the back of the binding to create the the perfect finish to a quilt.

    Saturday, March 27, 2010

    My Hand-Quilted Quilt

    One of my favorite quilts of all time is an all hand-quilted twin size blanket I made a little while back. Why do I like it so much? Number one reason - hand quilting. Even though it was a simple double parallel quilt stitch against all the seams, the hand-quilting gave this quilt the most amazing feel. I enjoyed every stitch of it - even when my hands were tired and my fingers got poked for the God-Knows all many times. I wish I had more time to hand quilt each blanket I make, but unfortunately I do not. I hope to maybe hand-quilt one item A YEAR using the hand-quilting method. I do hand-sew the binding back of all my quilts - even the machine quilted ones.

    Here's a few pictures of my hand-quilted quilt that I started at the end 2009 and finished early 2010 - the whole process took about 2.5 months.

    IMG_3312
    I used an earthy color palette of greens, browns, and whites.

    I machine pieced the top together, manually sandwich the layers together, basted it with red string, then ran parallel stiching about and 1/8" on each side of all the seems. This created a very discrete quilt top, showing off all the patterns of the fabric and minimal quilting distractions. The back of the quilt was very simple but elegant with parrallel straight lines creating a nice clean look. As with all my quilts I machine sew the front the binding on to the top of the quilt and hand-sew the back of the binding to the back of the quilt.


    IMG_3313
    A closer view of the quilt.  Notice the simple double line quilting along the backing - which was an all white muslin cloth. 

    IMG_3324
    Another view of the quilt - close-up.


    Quilt Info:
    Line-Square Simplicity (1)
    Front: 100% Cotton Print Fabrics
    Batting: 50/50 Bamboo & Cotton
    Backing: 100% Cotton Muslim 108"
    Completed Dimension: 72"x88"
    Quilting Method: Hand-Quilting, straight double lines
    Binding: Machine Sew to Front and Hand Sew to Back

    Friday, March 26, 2010

    Baby Rose

    Trying out some chenel fabric on a baby quilt. This quilt is for a baby shower of a dear friend of mine, Rosalyn, who is expecting her first child this summer - a girl! Generally I'm not a huge fan of pink motives and I have 2 boys so the chance for me to make something 'girly' is not that often. So what did I do with this quilt for my friend? I went completely GIRLY. Welcome BABY ROSE!

    IMG_3305

    Baby Rose quilt in my son's room. It makes a great addition to any nursery.  Down the line I'll like to make a baby boy version of this quilt.

    IMG_3304
    Another view of this quilt.  
     
    The chennel fabric is 100% cotton that borders the complete quilt and sections the blocks for the interior of the quilt - creating a nice frame around the quilting fabric. Cutting the chennel fabric is ... an ordeal. My regular rotary cutters were not enough to cut through the material so I had to resort to my good old fashion sewing scissors. After what seemed like hours of cutting, and a sore hand, I finally got the chennel fabric cut. It looked like a White Christmas when all the cutting was complete. So before - cut the fabric in a place where you could easier clean up the mess! I did this in my living room and the kids were having a blast blowing the white "ice" around.

    IMG_3168
    A look at the finish pieces - cut and ready ready for sewing.  On the bottom of the stack are some pieces I that I already sewed together.  Unfortunately I didn't get a chance to take a shot of the mess.  I had to clean it up before the kids got to it :P.

    I didn't use any kind of seam sealer - don't know why, but the whole idea of using a chemical like that didn't seem right to me. Because of that, the mess of the cut fabric continued on until - though totally not as bad as the cutting stage - the binding stage.

    After sandwiching the finished top with the batting (100% cotton Warm & Natural) and backing (100% cotton print) I headed over to my Juki for some quilting.  For the cotton print middle areas I went with a free-style swirl design.  Then I went around the middle and down each strip with a straight quilting line to create a boxed in swirl design. The combination of the swirls and straight line worked beautifully.

    IMG_3307
    A view of the finished back of the quilt.  The pastel green polka-dot on white turned out to be a great match to the front of the quilt.  The green went nicely with the touch of green on one of the print fabrics.  

    For the binding I went with a light pink fabric with very subtle white polka-dot.  At first I though the polka-dot from the backing would not work with the one on the binding.  But as you could see from the picture above, it went together quite nicely.

    After some hand binding - voila:  A beautiful, and completely girly quilt. It's so soft and cuddly and I know it's going to make a great gift for the new mom.

    Some key points to remember about using a bulky fabric like this against a regular quilting cotton print fabric:
    • Adjust your machine for the fabric difference. I had to adjust my walking foot to be highter and eased the tension of my thread.
    • Pressing the seams down is a lot more difficult. First off I had to decide which direction the press should go - open seams, to the side of the chennel fabric, or to the side of the quilting print fabric? I ended up pressing to the side of the chennel fabric on the seams that had the different fabric type. For all the other seams with chennel on chennel, or cotton print on cotton print I pressed the seams open. This worked out quite well.
    • The MESS! With regular cotton print fabric, the mess is minimal. But with chennel, you better prepare yourself for some cleanup afterwards.
    • A regular rotary blade may not be enough to cut through the fabric. I had to use a pretty heavy sewing scissor to break through the chennel fabric.

    Overall the whole design was a success. The quilt turned out beautifully and I can't wait to give it to Rosalyn.

    Quilt Info:
    Baby Rose (1)
    100% cotton
    Chenille and Cotton Print Fabrics
    Machine Quilting, Hand Binded

    My Juki


    I don't have a fancy long-arm machine (YET) but I know that my little Brother wouldn't handle the amount of quilting I'm planning to do. The solution, well at least my solution, was the Juki TL-98Q.  I've been piecing and quilting with it for a few weeks now.  The verdict? I like it A LOT.  Why I don't LOVE it?  Even though the neck is larger than a lot of home sewing machines, it is still quite small compared to a long-arm.  I tried the HandiQuilter at a local sewing machine shopped and it was fabulous.  But because of space and money constraints, I will have to live with my Juki for a little while.
    IMG_3296
    Juki sitting on my sewing table. It comes with a good size extended table top for more surface area - very good for quilting. 

    Features of the Juki TL-98Q   

    Tap foot thread cutter:
    In addition to the thread cutter button in the front of the machine Juki has also included a tap foot threat cutting button on the control foot. That way you could just tap (with the same foot as the control foot) to cut your thread. It took me a little while to get used to this option. I totally got into it when I put together pieces for my new quilt. Love the tap foot feature! I don't need to take my hands my quilting surface at all.

    Knee Head Left
    A must-have feature I now must have in any sewing machine. This is also great because I don't need to ever take my hands off the quilting surface. Just a slight push of my knee against the lifter and the sewing head goes up. I know I know, this is not a new feature and I have used it before on my mom's sewing machine, but I completely forgot about it since my old Brother did not have this feature. I don't think I could live without it anymore.

    Bobbin Winder
    It's fast, very easy to use. BUT it doesn't work in conjunction with sewing. One thing I liked about my Brother (one of not that many) is the option to wind the bobbin while I am sewing. I could choose to just wind the bobbin, just sew, or sew AND wind bobbin simultaneously. Though I did not often used both at the same time, it's nice to have on a time crunch when I don't want to be sitting there winding my bobbins - I could wind and sew at the same time. Like I said, the Juki-98Q does not have this feature. While the bobbin is winding the sewing mechanics do not function. Something minor, but I wish they have it on the Juki.

    Bobbin Size
    The bobbin used for this machine is also very small.  For sewing it's fine.  For quilting, it becomes quite a hassle.  For a crib/lap size quilt I usually need to have 4 full bobbins to complete the quilting.

    Needle Up/Down 
    A nice feature to have. This is something I could live without but it's nice none the less. With a push of a button I could make the needle go in the UP or DOWN position. Guess I'm pretty much used to the manual up/down wheel on most machines. Very useful at the start of a sewing line, with the needle up I slide in my fabric, then quick push of button I could have the needle go down so I could let go of my fabric without it sliding around. The button is also very close to the head of the sewing needle so I don't have to reach quite as far to get to the manual up/down wheel on the far right of the machine.

    Overall this is a great machine. It is very fast, quiet, and portable enough to move around when I need to use another machine. In my small sewing room it's a nice machine to have. I have already pieced together 3 quilt tops, 4 bindings, and quilting 2 quilts (pictures below). One quilt was a straight line that I used the walking foot with. I don't think I would be doing that again. There was a lot of bunching and awkward to against. I broke 2 needles trying to fix the bunching. The second quilt I used the 1/4" quilting foot. It worked beautifully. All I had to do was against a few settings and drop the dog feed and I was free-motion quilting in no time.

    LinkWithin

    Related Posts Plugin for WordPress, Blogger...