Showing posts with label Oops. Show all posts

Tuesday, June 22, 2010

A Change of Plans

It seems like I've been working on the Borders and Stripes quilt FOREVER!  Mostly due to lack of desire (I don't really want to work on a big quilt in the heat of the summer) and life (kids, work, etc).  So last week I took a stab at the quilting for this quilt.

And?  Disaster!  I went with a free motion quilt pattern on just the brown part of the quilt top.  BTW, my plan was to have different quilting throughout the quilt.  So after struggling for hours with the string tension of trying to do a dark bright thread for the top thread and off white for the bobbin (the quilt bottom was off white where the browns where on top - I know I know I should of planned it a little better right?), I gave up.  The quilting looked awful!

See for yourself this mess of a quilt job:
Okay, this picture doesn't show you all the awfulness with the quilting, but in person it is hideous.  The dark top thread IS NOT suppose to show on the bottom!  And don't even get me started on the top of the quilt.  most of it is too ugly to even share.


So what do I do?  Seam ripper becomes my companion...for a while...
You could see a little bit of the bad quilting top here.  No matter what I tried the tension of the string did not work.  It was constantly too tight or too loose and when I finally get it right for a little bit, the bobbin runs out and I have to start all over.  ARG!  Is my machine broken?

So - yeah a complete redo of the Borders and Stripes quilting.  Thank God I only did one brown section of these!  The hand quilting will resume after I get all these machine quilting OUT and GONE!

Tuesday, May 18, 2010

Quilting Along...

Been a while since I got to do any whole blanket quilting.  It was a hard decision picking the quilting thread color for the Modded Brown quilt.

After much thought - and some trial and error - I went with a dark gray, almost black, colored thread.

IMG_4425
The dark gray was a little shocking next to the light gray fabric when I first started to quilt, but I got used to it after a while.

How many different colors did I end up trying before settling on the final one?
  1. Dark brown. There was a lot of dark brown on the quilt so I decided to match, but it didn't really go well when quilted on top of the other colors.  Even on the dark brown, it thread color just blended and didn't provide much to the quilt top.
  2. Beige.  Went really well with the Red print and Olive print fabrics.  However it was too contrasting to the brown and didn't go well with the light gray at all.
Okay - 2.  I considered some other colors briefly - dark red, dark blue - but quickly decided against them.  The dark gray thread on this quilt is growing on me and now that I'm about 75% done, it is beginning to look like a good color choice :).

I don't use a quilting frame - more on that on a later post - so I had quite a task maneuvering this larger quilt time around.  But with the help of some sticky top gloves (my make-shift quilting clothes) I got it under control.

I garden a lot so I decided to get a clean pair of these gardening gloves from a local gardening center:

IMG_3797
These are very thin so it doesn't feel clunky when quilting.  All on the front are little sticky circles and provides a very nice grip for the quilt tops.  I got this for a couple of bucks :).

I still have a little bit of quilting to finish up for this quilt.  I'm kind of sad to see the quilting ending actually ... guess I really like this part of the process.  Well here's the quilt right now waiting to be finished.

IMG_4428

Tuesday, April 13, 2010

Cutting Long Strips

Doing something new again ... cutting fabric into long-long strips.  Which ones?

Remember this?
IMG_3383
I'm going to tackle the one with blue flowers first - pictured about 1/3 of the way down.

Yep it's the Bryant Park fabric I got a little while back.  Still don't have a concrete design in mind yet for this fabric - though I have a few things in mind.  All of which involves cutting the fabrics into strips.  So, let's get snipping.

I'm going to do the one with blue flowers with long borders first - Bryant Park Floral Stripe Natural (I think - again I'm not good about keeping track of my fabrics especially the design names).  Since I'm cutting along the length of the fabric and the one with blue flowers is 2 yards long, I decided it'll be easier to tackle the cutting with scissors.

Where to cut?  There's a brown border running along side the flowers.  My first instinct was to cut that in the middle and try to keep some of the border in the quilt.  But since the brown border was less than 1" wide it will not be significant if I tried keep it in by cutting it in half.  So I decided to cut two types of strips - one with ALL the brown border on both sides and one with no brown borders at all.

The first cut - oops I should have cut on the OTHER side of the brown border!  Arg - oh well onward....
IMG_3869
First cut - not so cool.  I was suppose to cut on the other side of the brown border.  Oh well, not I have more selvage to use for misc projects :(.  Check out Jacquie's blog for a cool selvage project.


Cut cut cut...
IMG_3872
Showing off the two different strips I get from one fabric - the one with the brown border is about 7 inches, and the one without is about 5 inches wide.  All the strips are 72" long - perfect for a full quilt width or maybe a lap quilt length-wise?

Cutting with scissors after using a rotary cutter for all other quilting cutting was different.  I love the feel of the scissors against the fabric - I use a Clauss 8" scissor - quite heavy and feels solid.  Some may think that's a little odd - but I also use wooden #2 pencils for almost the same reason.  I just really like "old fashion" equipment.  I like the heavy feel of it, I like how it's very reliable, and it last FOREVER!  Haha okay, a #2 pencil does NOT last forever, but it's been around for almost forever :P.

Okay back to the fabric.  After cutting along all the borders,  this was the result:

IMG_3874
The Stack - 4 strips without brown border, and 3 with.  Can't wait to find out what I'll decide to do with this ;).  Wish I have more time to design...


I'll update once I decide on a design :).

Thursday, April 8, 2010

Being Lazy Does NOT Pay Off

I'm sure most of us, if not all, have taken some kind of short for a quilt.  Waiting till a quilt top is almost complete before touching the iron, stacking up a bunch of fabrics to cut at one time, machine binding instead of hand binding, etc etc.   But most of the time shortcuts are fabulous.  They could be a great time saver, and in the end, the results are not compromised.

However, I'm not talking about those kind of shortcuts.  Nope, I'm talking about the ones that have gone BAD.  The ones that you know you should not do, but decided to anyways.  The ones that have terrible terrible outcomes.  For me, these results usually come from laziness.  Sometimes when I'm rushing to finish a project or have a good rhythm going and don't want to mess it up.  Whatever the reason, I could just sum it up as lazy.

My Example: Changing The Thread.

Have this ever happened to you?  You're sewing with one color, the bobbin is still full, the tension is great, but you have to move on to another project, and the other project needs another thread color???  Instead of switching out the bobbin and top thread I decided to just go for it.  It's a quilt top the seams threads are pretty much invisible right? WRONG.

I was putting together a quilt top with a mostly light colored theme, so I was using a beige thread - for both the top and bottom.  I had to switch over to finish my Modded quilt - which was mostly darker colors, especially the deep mocha color.  What I did next was a BIG mistake.  I give you the results of my laziness.

IMG_3807
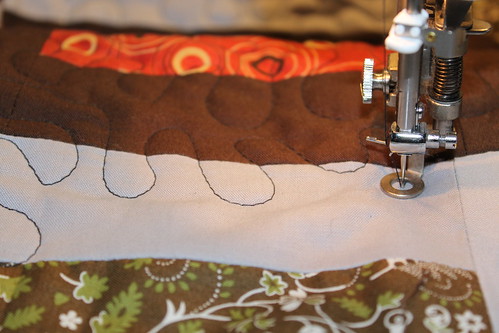
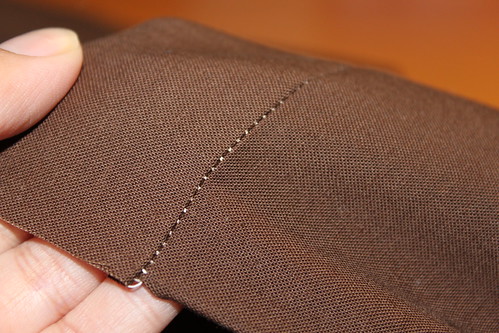
OOOOPS.  Yeah don't ever be lazy and not switch out the thread when the colors are so different :(.

How ugly is that??  Definitely NOT a good outcome.  Beige on mocha...not very discreet.  So I had to spend even more time fixing the problem.  Five minutes wasted, I had the seam completely ripped out.  You could see the damage at the left corner on the picture below.  Not cool.  Spent another five minutes carefully pulling out all the thread.  Waste of time and resources.

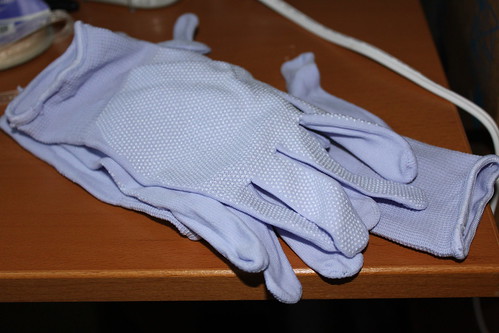
I couldn't find my black thread - thanks to my little toddler - so I opted for a dark olive thread.  It's dark enough for the mocha color and perfect for the green fabric on the quilt.

IMG_3810
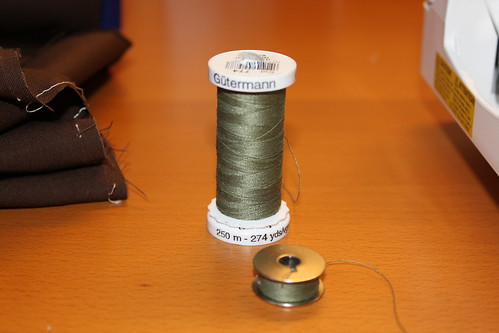
The lovely olive green thread.  Not much of it left but enough to finish the quilt top :).  Need to stock up for the quilting...though I'm not sure if I even want the quilting with this color ....

Okay so after another 5 minutes to swap out the thread and re-pinning the fabric, I am back in track.  What a difference a color change makes.

IMG_3811
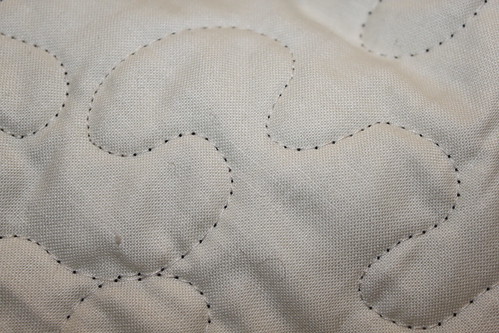
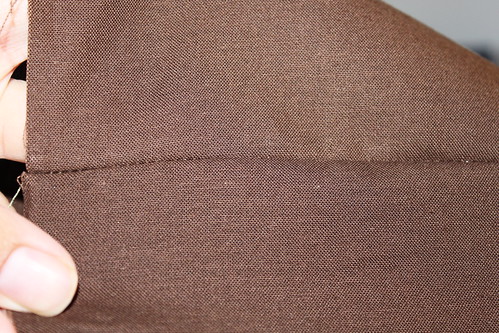
Even with the extreme closeup - the thread is barely visible.  Good, the quilt top is saved!


So lesson learn - some shortcuts are good, some are tragically bad.  And being lazy?  Better to avoid, because changes are, you'll have to spend more than correcting the mistake later. 

LinkWithin

Related Posts Plugin for WordPress, Blogger...